Quick Start (C++)
Sample Project
See the sample project for detailed implementation
Prerequisites
- Check if your target OS is supported
- Install CMake and make sure its version is 3.5 or later
- Sign in to Eyedid SDK Manage and get a license key & C++ SDK
- For mac os, you need to install XCode or Command Line Tools.
⚠️ Visual Studio 2017 or later is recommended. Previous version may work, but not tested.
Environment Set-Ups
- Log in and download Eyedid C++ SDK from Eyedid SDK Manage
- Extract the downloaded SDK and place it in your C++ project
- Create a CMake project, and add the following to your
CMakeLists.txt
Note that CMake minimum version is 3.5
- Windows
- MacOS
cmake_minimum_required(VERSION 3.5)
project(your_project_name)

add_subdirectory(eyedid)
target_link_libraries(your_project_name PUBLIC eyedid)

if(WIN32)
add_custom_command(TARGET your_project_name PRE_BUILD
      COMMAND ${CMAKE_COMMAND} -E copy
      ${EYEDID_DLL}
      $<TARGET_FILE_DIR:your_project_name>)
endif()
cmake_minimum_required(VERSION 3.5)
project(your_project_name)

add_subdirectory(eyedid)
target_link_libraries(your_project_name PUBLIC eyedid)
- You have to change
your_project_nameto your actual project name
Set up is done! You can now proceed to the next step
Steps
Initialize Eyedid SDK
Initialize Eyedid SDK by calling eyedid::global_init()
This function must be called at least once within a program before the program calls any other function in Eyedid SDK.
#include "eyedid/gaze_tracker.h"

int main() {
  try {
    eyedid::global_init();
  } catch (const std::exception& e) {
    std::cerr << e.what() << '\n';
    return EXIT_FAILURE;
  }
}
See API docs for global_init exceptions.
Authentication
Before you call GazeTracker's member functions, you must authenticate it with a license key.
You can get a license key at Eyedid Manage
eyedid::GazeTracker gaze_tracker;
auto auth_code = gaze_tracker.initialize("LICENSE_KEY");
if (auth_code != 0) {
  // authentication has failed!
}
See here if authentication fails.
Add listener
Eyedid SDK's main target is real-time gaze tracking, so its calculation is done asynchronously.
To get the result, you have to implement appropriate interface
Following code is implementing ITrackingCallback to get a gaze result.
#include "eyedid/gaze_tracker.h"

class OnTrackingListener : public eyedid::ITrackingCallback {
 public:
  void OnMetrics(uint64_t timestamp,
              GazeInfo gaze_info,
              FaceInfo face_info,
              BlinkInfo blink_info,
              UserStatusInfo user_status_info) override
  {
    // x, y are the gaze point
  }
};
// ...
OnTrackingListener listener;
gaze_tracker.setTrackingCallback(&listener);
The x and y in the above GazeInfo comes out in millimeters, where it's origin is same as the center of the camera(which shoot the input image).
You can change its value based on other coordinate system, such as pixels in display. See Advanced.
Input an image
An image's color format must be RGB, and it's memory must be contiguous. Current time in milliseconds must be provided too.
Example using OpenCV
const auto current_time = []{
  namespace chrono = std::chrono;
  return chrono::duration_cast<chrono::milliseconds>(chrono::system_clock::now().time_since_epoch()).count();
};

cv::VideoCapture video(0); // open webcam
cv::Mat frame, input;

while(true) {
  video >> frame; // read frame
  if (frame.empty()) break;

  cv::cvtColor(frame, input, cv::COLOR_BGR2RGB); // convert color format

  gaze_tracker.addFrame(current_time(), input.data, input.cols, input.rows);
}
Some input can be ignored for some reasons. See here.
How to Allow libeyedid_core.dylib on macOS
When running an application that links against the libeyedid_core.dylib library on macOS, you may need to adjust your security settings to allow its execution. Follow the steps below to enable and use libeyedid_core.dylib:
1. Error Message Upon Application Launch
When you run an application that uses libeyedid_core.dylib, you might see the following error message:
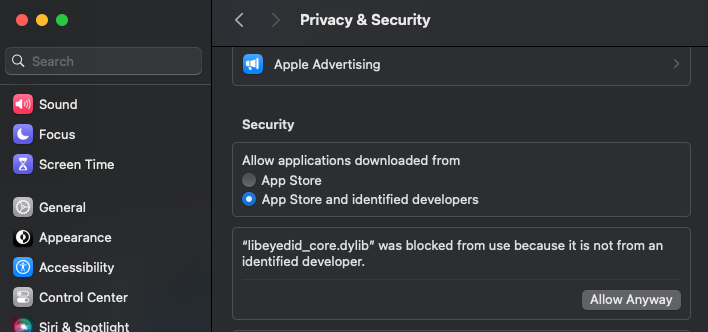
“libeyedid_core.dylib” was blocked from use because it is not from an identified developer.
2. Open System Preferences
- After seeing the error message, open System Preferences on your Mac.
- You can open System Preferences by clicking the Apple logo in the top-left corner of your screen and selecting "System Preferences" from the dropdown menu.
3. Navigate to Security & Privacy Settings
- In System Preferences, click on the Privacy & Security (or "Security & Privacy") icon.
4. Allow the Blocked Library
- Scroll down to the "Allow applications downloaded from" section in the Privacy & Security panel.
- You should see a message stating that
libeyedid_core.dylibwas blocked. - Click the "Allow Anyway" button to permit the execution of
libeyedid_core.dylib.

5. Relaunch the Application
- After clicking "Allow Anyway," relaunch the application. You should now be able to use
libeyedid_core.dylibwithout issues.
Important Notes
- This process is specific to macOS. Only allow
libeyedid_core.dylibif it is from a trusted source. - After allowing the library, ensure that the application functions as expected.